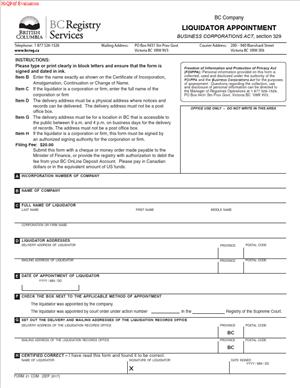
Form 21 – Notice of Appointment of Liquidator
Fill out nowJurisdiction: Country: Canada | Province or State: British Columbia
What is a Form 21 – Notice of Appointment of Liquidator?
Form 21 is a statutory notice. It tells the British Columbia corporate registry that a liquidator has been appointed for a company. It records the liquidator’s name, address for service, and appointment date. It also states whether the appointment arose by a shareholders’ resolution or by a court order. The registry adds this notice to the public record for the company.
You use Form 21 after a liquidator has been validly appointed. The appointment happens first. It is made either by a special resolution of shareholders or by a court order. The form does not appoint the liquidator. It documents and publishes the appointment so third parties can rely on it.
Who typically uses this form?
Directors, corporate secretaries, and in‑house counsel often prepare it. Insolvency practitioners and professional liquidators file it after court appointments. External corporate lawyers file it for clients during voluntary liquidations. Creditors and other stakeholders do not file the form. They use the public record it creates to know who to contact.
Why would you need this form?
The law requires it. Once a liquidator is appointed, public disclosure must follow. The form gives creditors a clear address for service. It confirms who can collect assets and deal with claims. It helps banks, landlords, suppliers, and tax authorities know who is in charge. It also marks a shift in authority. From that point, the liquidator, not the board, controls the company’s wind‑up.
Typical usage scenarios
- A solvent wind‑up. You have sold the business and want to close the company. Shareholders pass a special resolution to liquidate and dissolve. You appoint a liquidator. You file Form 21 to record that appointment.
- An insolvent wind‑up ordered by the court. A creditor obtains a court order appointing a liquidator. The liquidator files Form 21 with the order details. The public record updates the same day or shortly after.
- A mid‑process replacement. Your current liquidator resigns or is removed. A new liquidator is appointed by resolution or court order. You file Form 21 to show the new liquidator’s details.
- A group reorganization. You are cleaning up dormant subsidiaries. Each subsidiary appoints a liquidator by special resolution. You file Form 21 for each company.
In each case, Form 21 ensures transparency. It allows counterparties to redirect all matters to the liquidator. It helps prevent unauthorized actions by former directors or officers.
When Would You Use a Form 21 – Notice of Appointment of Liquidator?
You use Form 21 immediately after a liquidator is appointed. Do not wait. Timely filing reduces risk and meets statutory duties. In practice, the form is prepared in parallel with the resolution or court materials. You file as soon as the appointment takes effect.
Consider these practical situations:
You own a small BC company. It is solvent and no longer needed. Shareholders vote to liquidate and dissolve. They appoint an experienced accountant as liquidator. You complete Form 21 the same day with the liquidator’s name and address. You submit it and keep the registry confirmation.
You are a creditor of a company that has stopped paying its debts. You seek a court order to appoint a liquidator. The court grants the order and names a licensed insolvency practitioner. The liquidator files Form 21 with the court file details. You can now serve your proof of claim at the listed address.
You advise a larger corporate group. The group is closing multiple inactive subsidiaries. Each board arranges a shareholders’ resolution for liquidation. Liquidators are named for each entity. You coordinate Form 21 filings for each company to unify public records.
You are a professional liquidator. A current engagement adds a co‑liquidator for capacity reasons. The shareholders approve the joint appointment. You file a new Form 21 naming both liquidators and the mode of acting, if required by the form.
Typical users include business owners, directors, corporate secretaries, in‑house counsel, external corporate lawyers, accountants, and licensed insolvency practitioners. Banks, landlords, suppliers, tax authorities, and employees rely on the filed notice. They use it to route demands, claims, and information to the liquidator.
If a company is already in liquidation and there is a change in the liquidator, a fresh filing is required. You use the same form to notify the registry of a new appointment. If the change is only an address update for the liquidator, you use the proper change notice instead. If you are unsure, check the specific filing type before submitting.
Legal Characteristics of the Form 21 – Notice of Appointment of Liquidator
Form 21 is a statutory notice under the Business Corporations Act. Section 329 governs the appointment of a liquidator and the related filings. The form gives legal effect through public notice. It is part of the company’s official corporate record. Anyone may rely on the registry’s record when dealing with the company.
The form itself does not create the appointment. The legal act is the shareholders’ special resolution or the court order. The notice is the public confirmation that a valid appointment has occurred. It links the company to the liquidator by name and address. It also records the appointment date, which matters for legal timelines.
The filing is legally binding because the Act requires it and prescribes the content. The registry accepts the filing and updates the record. Third parties may then serve legal documents at the liquidator’s listed delivery address. Service at that address is effective. This supports enforceability in practice.
What ensures enforceability? Accuracy, timeliness, and proper authority. The resolution or order must be valid. The person named must consent and must not be disqualified. The notice must match the resolution or order exactly. Names, dates, and addresses must be correct. The filer must have authority to submit the notice.
There are consequences for false or misleading filings. Penalties may apply. The registry may refuse or reverse filings that do not meet requirements. Delayed filings can create risk. Directors may remain exposed to claims for actions taken after the appointment date. Vendors may rely on outdated records and act on incorrect instructions. Prompt, accurate filing avoids these issues.
Appointment of a liquidator changes control. Directors’ powers end, except where the Act or the liquidator allows limited actions. The liquidator assumes custody of assets, books, and records. The liquidator then carries out the wind‑up. This includes realizing assets, paying claims in order, and distributing any surplus to shareholders. The public filing signals this shift and supports stakeholder cooperation.
In some cases, more than one liquidator is appointed. The notice should state each liquidator. If the form requests it, indicate whether they act jointly or jointly and severally. That detail affects how documents are signed and how instructions are given. It also informs third parties about the authority to bind the estate.
Form 21 is part of a sequence of liquidation filings. Other filings may include a notice that the company is in liquidation and a final dissolution filing. If the liquidator changes, another notice is filed. If the liquidator ceases to act, that must also be recorded. The goal is to keep the registry record current from start to finish.
The notice becomes a public document. Treat the address for service as a public address. Do not list private addresses unless you accept public disclosure. Use a professional office address where possible. Ensure you can receive documents at that address during business hours.
How to Fill Out a Form 21 – Notice of Appointment of Liquidator
Follow these steps to complete and file the form correctly.
1) Confirm the appointment and authority.
- Ensure a valid shareholders’ special resolution or court order exists.
- Verify the exact appointment date and the effective time, if stated.
- Confirm that the company name and incorporation number match the corporate record.
2) Obtain the liquidator’s consent to act.
- Get written consent from the liquidator before filing.
- Check eligibility and conflicts. The liquidator must be able to act.
- If there are multiple liquidators, obtain consent from each one.
3) Gather company identification details.
- Legal name of the company as shown on the registry.
- Incorporation or registration number (the BC company number).
- The current registered and records office addresses, for reference.
- If the company uses an assumed name, ignore it. Use only the legal name.
4) Identify the type of appointment.
- Select whether the appointment is by shareholders’ resolution or court order.
- If by resolution, note the resolution date and, if applicable, the resolution number.
- If by court order, record the court registry location, file number, and order date.
5) Complete the liquidator information.
- Full legal name of the liquidator. Include middle names for individuals.
- If the liquidator is a firm, use the full legal name of the firm.
- Provide the delivery address for service. Include suite, street, city, province, and postal code.
- Provide a mailing address if different from the delivery address.
- Add a contact email and phone number if the form requests them.
6) State the appointment date.
- Enter the effective date exactly as per the resolution or order.
- If the appointment is conditional, file only after conditions are satisfied.
- Do not predate or backdate. The registry records the actual filing date.
7) List multiple liquidators, if any.
- Enter each liquidator’s full name and address.
- If the form allows, indicate whether they act jointly or jointly and severally.
- If space is limited, attach a schedule listing all liquidators and their addresses.
8) Attach supporting documents if required.
- Attach a certified copy of the shareholders’ special resolution, if requested.
- Attach a copy of the court order if the appointment is court‑ordered.
- Attach each liquidator’s written consent to act if the form requires it.
- Label each attachment clearly to match the form sections.
9) Review for accuracy and consistency.
- Check that all names match the resolution or order exactly.
- Confirm the incorporation number is correct.
- Ensure the address for service is complete and can accept delivery.
- Confirm dates are accurate and consistent across the form and attachments.
10) Sign the form.
- The liquidator usually signs the notice. Follow the signature block guidance.
- If the company must sign, use an authorized signatory. Print name and title.
- Date the signature. Do not predate.
- If there are multiple liquidators, ensure each signs, if required.
11) Pay the filing fee.
- Confirm the correct fee for this filing type before submission.
- Arrange payment by the accepted method. Keep proof of payment.
- If using a service provider, confirm their fee and the registry fee separately.
12) File the form with the registry.
- File electronically if available. It is faster and reduces errors.
- If filing by paper, use the current version and clear printing.
- Retain the submission confirmation and a stamped copy, if provided.
- Store copies in the liquidation file and the company’s records.
13) Notify key stakeholders.
- Send a copy of the filed notice to directors and officers.
- Provide the notice to major creditors, banks, and landlords as needed.
- Share the address for service with tax authorities and insurers.
- Update any ongoing counterparties so they route documents correctly.
14) Monitor the public record.
- Check the corporate record to confirm the appointment appears correctly.
- Verify the liquidator’s name and address display as filed.
- If there is an error, file a corrective notice promptly.
15) Maintain current information.
- If the liquidator’s address changes, file the appropriate change notice.
- If a liquidator resigns or a new one is appointed, file a new Form 21.
- Keep contact details current to ensure effective service of documents.
Practical tips:
- Use the exact legal names from official identification. Avoid short forms.
- List a delivery address that is staffed during business hours.
- If the liquidator is an individual, avoid a home address if possible.
- If a court order includes specific terms, mirror those terms in the notice.
- If two liquidators can act alone, state that if the form provides for it.
- Keep a checklist of all pieces filed and sent to stakeholders.
Common pitfalls to avoid:
- Mismatched names between the resolution and the form.
- Wrong incorporation number or a number from another entity.
- Missing court file details for court appointments.
- Omitting the liquidator’s full delivery address for service.
- Late filing that confuses creditors and counterparties.
After filing, the liquidator should assert control promptly. Collect the company’s books, records, and assets. Ask banks to freeze unauthorized access. Notify counterparties to redirect all contact to the liquidator. The public record created by Form 21 will support these steps.
If you are acting for a group of companies, file a separate Form 21 for each company. Do not rely on a single filing to cover all entities. Each company is a separate legal person. Each needs its own notice.
If there is any uncertainty about the appointment’s validity, resolve it before filing. An invalid appointment cannot be cured by filing a notice. Align the resolution or order, the consent, and the notice. Then file without delay.
In summary, Form 21 is simple but important. It confirms to the world that a liquidator is in charge. It sets the address for legal service. It supports a clean and orderly wind‑up. Complete it carefully. File it promptly. Keep it accurate throughout the liquidation.
Legal Terms You Might Encounter
- Liquidator. The person or firm you appoint to wind up the company. On Form 21, you name the liquidator and give their address for service so others can reach them.
- Liquidation. The process of closing the company, selling assets, paying debts, and distributing any remainder. The appointment you report on Form 21 starts that process.
- Appointment. The legal act of putting a liquidator in place. Form 21 is the official notice that confirms who was appointed and when the appointment took effect.
- Effective date. The date the appointment starts. You must enter this date on Form 21 so everyone knows when the liquidator’s authority begins.
- Special resolution. A shareholder decision with the required approval threshold. If shareholders appointed the liquidator this way, Form 21 records that basis of appointment.
- Court order. A judge can appoint a liquidator. If that happened, you would identify the appointment as court-ordered on Form 21 and keep the order with your records.
- Registered office and records office. The official addresses on the corporate register. Form 21 uses these to match your filing to the correct company.
- Address for service. The address where legal documents can be delivered to the liquidator. Form 21 requires a delivery address so creditors and others can serve documents.
- Consent to act. The liquidator must agree to serve. Although the consent is not usually filed with Form 21, you should obtain and retain it before you sign.
- Resignation or removal. A liquidator can step down or be replaced. If that occurs after Form 21, you may need a follow-up filing to update the register with the change.
- Replacement liquidator. A new liquidator who takes over if the first one leaves or is removed. Keep clear records to show the transition and update filings as needed.
- Incorporation number. The unique number assigned to your company. You use it on Form 21 to prevent any mix-up with another entity.
FAQs
Do you need shareholder approval to appoint a liquidator?
Yes, if shareholders are making the appointment. You typically need a special resolution. Record the appointment details and effective date, then file Form 21 to give public notice.
Do you file Form 21 if a court appoints the liquidator?
Yes. Form 21 still applies. Select the court appointment basis in the form. Keep a copy of the court order with your company records.
Do you need the liquidator’s consent before filing?
Yes. Get written consent before you sign. Keep it in the company minute book. You may be asked to produce it later.
Do you list more than one liquidator on Form 21?
You can, if more than one was appointed. Enter each liquidator’s full name and address for service. Make sure the form reflects how they were appointed to act together or separately.
Do you need the liquidator’s professional license details?
No. Form 21 does not ask for a license number. You must still ensure the appointee is qualified and willing to act.
Do you have to notify creditors after filing Form 21?
Yes. Creditors should be informed promptly so they can submit claims and direct all communications to the liquidator. Keep copies of all notices you send.
Do you need to update Form 21 if the liquidator’s address changes?
Yes. File an update notice if the liquidator’s address for service changes. That ensures proper delivery of legal documents.
Do you need to pay a fee when filing?
A filing fee usually applies. Plan for payment when you submit Form 21. Keep the payment confirmation with your records.
Checklist: Before, During, and After the Form 21 – Notice of Appointment of Liquidator
Before signing
- Company legal name, including suffix.
- Incorporation or registration number.
- Registered office and records office addresses.
- Basis of appointment: special resolution or court order.
- Date the appointment takes effect.
- Full legal name of each liquidator.
- Delivery address and mailing address for each liquidator.
- Written consent from each liquidator to act.
- If replacing a prior liquidator: resignation or removal details.
- Authorized signatory’s name and signing authority.
- The minute book was updated with the resolution or order.
During signing
- Verify the company name matches the register.
- Confirm the incorporation number is accurate.
- Check the effective date of the appointment.
- Confirm each liquidator’s name spelling and addresses.
- Ensure the address for service is complete and is a physical delivery address.
- Confirm the basis of appointment is correctly selected.
- Verify you hold the liquidator’s written consent.
- Review any replacement details, if applicable.
- Sign in the correct capacity and date the form.
- Review the entire form once more for consistency.
After signing
- File Form 21 with the corporate registry promptly.
- Pay the filing fee and save the receipt.
- Request and save the filing confirmation or receipt number.
- Place a copy of the filed form in the minute book.
- Send a copy to the liquidator and key officers or directors.
- Update bank, insurers, landlords, and major counterparties.
- Notify creditors and invite claims with clear submission details.
- Redirect mail to the liquidator’s address for service.
- Keep a filing calendar for any required follow-up notices.
- Monitor for address or personnel changes and file updates as needed.
Common Mistakes to Avoid
Don’t forget the effective date. If you omit or misstate the date, the liquidator’s authority can be unclear. That can delay asset sales and payments.
Don’t list the wrong address for service. A P.O. box alone may not be acceptable. If documents cannot be delivered, you risk missing deadlines and court issues.
Don’t file without the liquidator’s written consent. If the liquidator never agreed to act, the appointment can be challenged. Always secure consent first.
Don’t mismatch names and numbers. A typo in the company name or number can misfile your notice. That can leave the register showing no valid liquidator.
Don’t delay creditor notifications. Late notice can increase disputes and interest charges. Notify promptly and keep proof of delivery.
What to Do After Filling Out the Form
File and confirm
- Submit Form 21 and pay the fee.
- Save the filing confirmation. Check that the register shows the liquidator.
Organize governance records
- Add the resolution or court order to the minute book.
- File the liquidator’s consent and engagement terms with the records.
Transfer control to the liquidator
- Deliver company records, asset lists, contracts, and insurance policies.
- Hand over keys, passwords, and access credentials.
- Redirect all inquiries to the liquidator.
Secure assets and accounts
- Freeze unauthorized spending.
- Assist the liquidator in opening a liquidation trust account.
- Inventory cash, receivables, and physical assets.
Notify stakeholders
- Send notice to creditors with claim instructions and deadlines.
- Inform employees, contractors, and major customers of the appointment.
- Notify banks, payment processors, and insurers.
Manage contracts and operations
- Identify executory contracts to keep, assign, or terminate.
- Collect receivables and stop non-essential services.
- Cancel automatic payments that are no longer needed.
Address tax and filings
- Provide the liquidator with prior tax returns and filings.
- Ensure required filings continue during liquidation.
- Track withholding, payroll, and sales taxes until operations cease.
Claims and distributions
- Gather creditor claims and verify supporting documents.
- Prepare a proposed distribution plan.
- Pay secured and priority claims in the correct order.
- Document every payment and communication.
Reporting and records
- Keep detailed ledgers, bank statements, and receipts.
- Prepare interim reports for creditors and shareholders as required.
- Maintain a log of decisions and approvals.
Amendments and changes
- File an update if the liquidator’s address or name changes.
- If a liquidator resigns or is replaced, file the change promptly.
Prepare for the conclusion
- Confirm all assets are realized and claims are settled.
- Prepare final accounts and a closing report.
- Coordinate any final distributions to shareholders.
- Complete any final registry filings to close the liquidation stage.
Retention and follow-up
- Store all liquidation records for the required retention period.
- Keep a calendar reminder for any post-closing obligations.
Disclaimer: This guide is provided for informational purposes only and is not intended as legal advice. You should consult a legal professional.